• Home
  • Blog
  • About
    • Paintings
    • Gel Prints
    • Journal Pages
    • Mandals
    • Digital Collage Sheets
    • E-Books & Zines
    • Mandala Coloring Pages
    • Classes
    • substack
Menu

Journal Girl

Street Address
City, State, Zip
Phone Number

Your Custom Text Here

Journal Girl

  • Home
  • Blog
  • About
  • Portfolio
    • Paintings
    • Gel Prints
    • Journal Pages
    • Mandals
  • Shop
    • Digital Collage Sheets
    • E-Books & Zines
    • Mandala Coloring Pages
    • Classes
    • substack

a hand made alphabet

May 8, 2014 Samie
image.jpg

Remember me? 

I wanted to leave the gouache post up for a bit, since I've gotten so many questions about it; I also had a busy weekend, which means I was knocked down with a flare up Sunday night (it's cleared up, btw, which means studio time tomorrow!).  

image.jpg

Last week, I decided to tackle carving my own alphabet stamp set. I'm teaching a stamp carving class here in Phoenix later this month, and wanted to have a nice spread of different things you can create. Plus, my skills were a bit...rusty! And of course, this is one of those crafts that you just can't stop once you start up again, so I've been carving up a storm! 

image.jpg

I threw down some watercolor on a spread in my art journal and decided to keep a little record of what I've carved. Some of these need to be cleaned up - I have a feeling I'll clean them up until there's nothing left! - but love the little set. I kinda want to tackle a cursive one, next...

image.jpg

I also had the crazy idea of carving Captain American's shield (I'm a touch consumed at the moment, but am a life-long comics fan). I did those little arrows in the corner as well, so I'm thinking I may make a complete Avenger's set. Not that I can use them in artwork, but a lot of the fun of carving is in carving...cutting away the letters or shapes and creating something from your hands, a cheap cutter, and erasers (the alphabet is from cheap white erasers, the rest from some speedy cut I've had since my last Stamp Making Obsession). 

image.jpg

I use a lot of these in my art, as I don't have to worry about copyright issues...plus, I love having pages and paintings that are ALL MINE...from the stamps to handmade papers to the figures I draw. It's a certain kind of magic, to hold a finished thing in your hands. You took raw materials and made it with hard work and perseverance. 

(Notice I didn't say talent. That's because we can all do it, make stamps or draw or paint...just takes lots of practice, commitment, & enthusiasm!)

In in the studio Tags stamps, stamp carving, inspiration, nerd
Comment

Circuit Stencil Blog Hop Fun!

July 31, 2013 Samie
circuitheadimage.jpg
NatKalbachStencilbloghop.jpg

I'm participating in another blog hop this month, this time for my new friend Nathalie Kalbach. I met Nathalie at CHA last January when she shouted out at me when I was walking past a booth that she knew me, and we later were able to chat. She's one of the people I've kept in touch with since then, and will be participating in Art Journal Summer Camp as one of my guest artists!  

When she asked me to help her get out the word about her new stencils through StencilGirl, I jumped at the opportunity to help a friend! Plus, as you know, I do love my stencils! Oddly enough, this spread was completed before last week's hop spread as part of my initiative to plan things out ahead of time! 

Today, myself and my fellow blog hoppers are playing with her Circuit stencil. I love how original her ideas for stencils are, and how HER they are! As a nerd girl and technology-junkie, I HAD to get this one! It got me to journal about my fannish self for the first time, and was a great stencil to play with. Allow me to show you...

circuit1.jpg

I started by randomly spraying through the stencil in my Dylusions art journal with one of her ink sprays and SEI tumble dry. Why 2 different ones? The Dylusions spray will re-activate with water where the SEI spray is permanant!  

circuit2.jpg
circuit3.jpg

I then painted with gesso over random parts of the spread & did the edges with a lovely ginger color of Silks Acrylic Glazes.  

circuit4.jpg

I then stenciled through the stencil I introduced last week with fluorescent red paint. I also put washi tape along the seam to keep anything from leaking through (usually I do this first, but I started this page while working on other things!). 

circuit5.jpg
circuit6.jpg

I'm crazy about silhouette's lately and am glad I have bunches I've made myself. They're really easy to make and can really help when you're blocked or don't know what to do on a page. After I painted around my stencil with a dry brush of mixed paint, I jumped to the facing page while that paint dried and made marks with some Adirondack color wash. 


circuit7.jpg

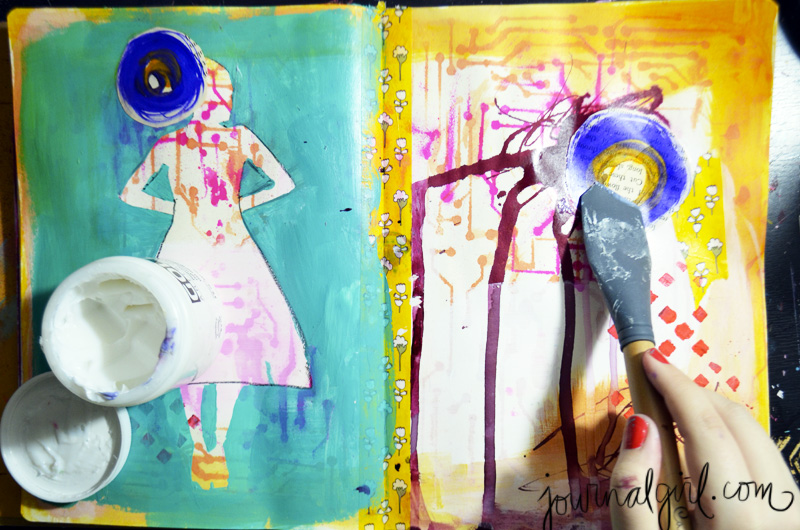
I then poured out some color wash and let it drip down the page. The circles are bits I made for Art Journal Summer Camp as samples that fit as embellishment. I'm gluing them down with gel medium and using a Catalyst wedge.   

circuit8.jpg
circuit9.jpg

I then focused on her dress. The interior color came from a Portfolio Oil Pastel and is lined with a Stabilo pencil. I then got that fluorescent red paint back out and stenciled part of the circuit pattern inside it to pull it out from the background. While I loved having it in the background, I wanted to highlight the stencil and add more pattern to her dress since I calmed it down with the oil pastel color. 


circuit10.jpg
circuit11.jpg

Next, I did some writing. First, along the drips with a black EF Molotow paint pen, then through the stencil with a pink glitter Sharpie paint pen. Just a little bit of detail-y fun!I  

circuit12.jpg

I grabbed these stickers on clearance at Michaels and just love them! They're not very thick so they don't add too much weight or thickness to a journal page, are tall and thin, and are glossy. I'm thinking I have to go get some more! I've been loving using them to give my pages "titles," that is, words to clarify the main message or idea on the page. Plus, when I looked at this silhouette, all pretty and pink, with computer circuits running through her, I was like, "OMG, me! Nerd girl!" I love being a nerd and am super psyched to have a page for that part of myself in my journal! 

circuit13.jpg

I added some repetitive stamping with a hand carved stamp, rubbed some Letraset letters into the silhouette, and wrote down all the nerdy things I love on the page. I'm sure there are more, but here's the big ones (and I'm actually listening to Star Trek: TNG while I write this post)! 

circuit15.jpg

I was eyeing a sumi-e brush when I sat back, and decided to write with india ink on the right-hand side. Since I hadn't been feeling well, and art is my way of coping and self-care, I decided that it would be the best reflection of the nerd girl page if I acknowledged the self-care ritual of art journaling. In order to calm the background and bit and make the words easier to see, I painted around some of the letters with grey paint. I wanted to paint around all of them, but couldn't be bothered, haha! But I like the effect of only some being painted around, so it worked out! 

circuitdetail1.jpg

And hey, I know some very giving people, because Nat has maybe mentioned that if you leave a comment on her blog, you can win this stencil! And each blog you visit & leave a comment on enters you to win as well! You have time to comment till August 6, 2013 - midnight EST.
 

Don't forget to visit the other blogs on the hop!  

Nathalie Kalbach

Stephanie Schütze

Birgit Koopsen

Marjie Kemper

Samie Harding - you are here!


What parts of you haven't made their way into your art journal? How can you incorporate more YOU in your journal? 

I also wanted to thank all of you for the lovely comments on my last post!  I have been a bit under the weather with my FMS, but have read every single one  and wanted to say thank you ! I'll be replying this week to all your lovely words! 

In tutorials, art journal Tags stencilgirl stencils, stencils, circuit stencil, nerd
Comment

POWERED BY SQUARESPACE.